Author: approval

  • How to Create a Weekly Workout Schedule

    How to Create a Weekly Workout Schedule

    Creating a weekly workout schedule can make exercise easier to organize and maintain. Instead of deciding what to do every time you want to exercise, you can plan your activities in advance and give yourself enough time for movement, rest, and recovery.

    A good workout schedule does not need to be complicated. Beginners can start with a few exercise sessions each week and gradually develop a routine that fits their daily responsibilities. The goal is to create a schedule that is realistic, balanced, and safe.

    Your schedule should also allow flexibility. Some days may be busy because of school, work, family activities, or other responsibilities. Missing or changing one workout does not mean you have failed. You can simply adjust the rest of the week.

    Start by Understanding Your Goals

    Before creating a weekly workout schedule, think about what you want exercise to help you achieve.

    Your goal might be to:

    • Improve general fitness
    • Develop physical strength
    • Improve flexibility
    • Become more active
    • Improve balance and coordination
    • Build better exercise habits
    • Support participation in a sport

    Your goals can help determine which activities you include.

    For example, someone interested in improving strength might include bodyweight exercises such as squats, push-ups, lunges, and planks. Someone interested in general fitness might combine strength exercises with walking, cycling, dancing, or another enjoyable activity.

    You do not need to choose only one goal. A balanced routine can include several types of physical activity.

    Consider Your Current Fitness Level

    A schedule should match your current ability.

    If you are new to exercise, starting with demanding workouts every day is unnecessary. Begin with manageable sessions and allow yourself time to adapt.

    For example, a beginner might start with three strength-focused workouts during the week, separated by easier days.

    Someone who already participates in regular physical activity may be comfortable with a different schedule.

    The important thing is to avoid making the first week so difficult that you cannot maintain the routine.

    Choose the Days You Can Exercise

    Look at your normal week and identify days when you have enough time for exercise.

    You might have more free time on certain days and less on others.

    For example:

    Monday: Available for exercise

    Tuesday: Busy

    Wednesday: Available

    Thursday: Busy

    Friday: Available

    Saturday: More free time

    Sunday: Rest or light activity

    This gives you a basic structure.

    You can then decide what type of activity belongs on each day.

    Include Different Types of Exercise

    A balanced weekly schedule can include several types of movement.

    These may include:

    • Strength training
    • Walking
    • Cardio activities
    • Mobility exercises
    • Flexibility work
    • Balance exercises
    • Recreational activities
    • Rest

    You do not need to perform every type of activity every day.

    For example, you could use strength exercises on some days and lighter activities on others.

    This variety can make your routine more interesting and help you avoid repeatedly stressing the same movements.

    Plan Strength Training Days

    Strength exercises can be performed at home without equipment.

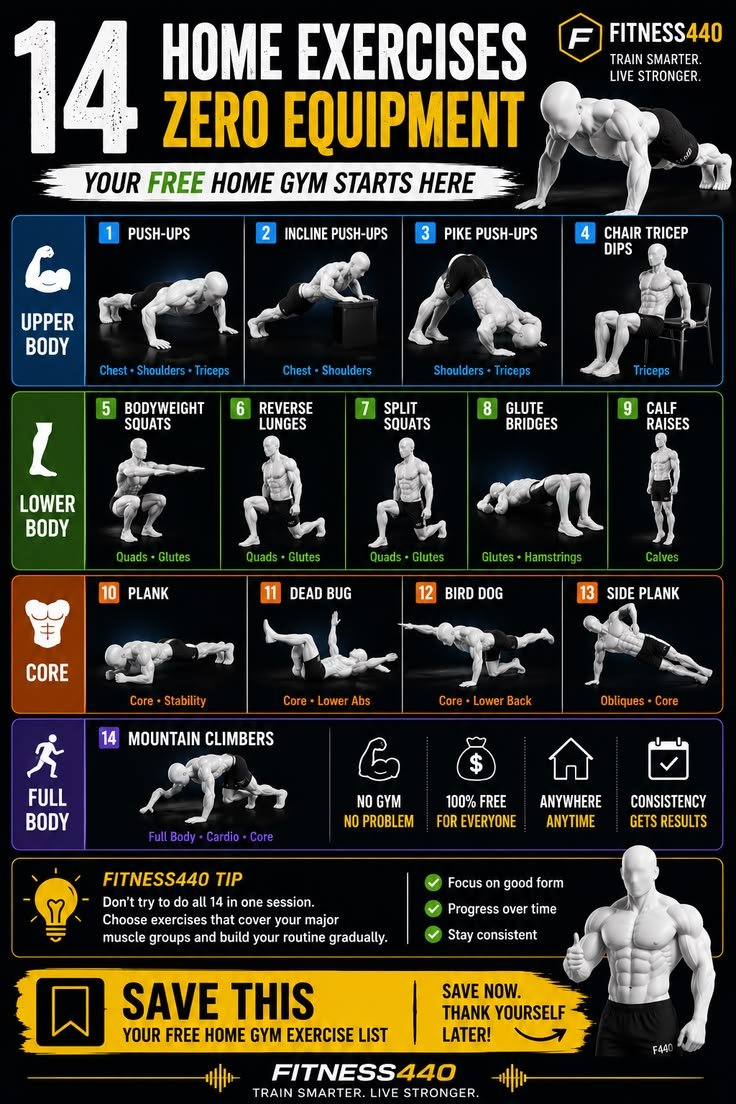
    Some beginner-friendly exercises include:

    • Bodyweight squats
    • Wall push-ups
    • Incline push-ups
    • Reverse lunges
    • Glute bridges
    • Calf raises
    • Bird dogs
    • Planks
    • Step-ups

    You can choose several exercises and perform them during a short session.

    A beginner does not need a complicated workout containing dozens of exercises.

    Focus on controlled movement and good technique.

    Give Your Body Recovery Time

    Recovery is an important part of a weekly schedule.

    Your body needs time to rest between demanding sessions.

    Instead of performing challenging strength workouts every day, you can place easier activities or rest days between them.

    For example:

    Monday: Strength

    Tuesday: Light activity

    Wednesday: Strength

    Thursday: Rest

    Friday: Strength

    Saturday: Easy recreational activity

    Sunday: Rest

    This is only an example. Your own schedule can look different depending on your activities and responsibilities.

    Add Walking or Light Activity

    Walking is an easy way to stay active on days when you are not doing a structured workout.

    You can walk around your neighborhood, walk with family members, or simply include more movement during your normal day.

    The intensity does not need to be high.

    Light activity can also provide a break from sitting for long periods.

    If you have been studying or working at a desk, getting up and moving around can be a simple way to add more activity to your day.

    Include Flexibility and Mobility

    Flexibility and mobility exercises can be added to your weekly routine without requiring a separate long workout.

    You can spend a few minutes after certain exercise sessions performing gentle stretches.

    Useful movements may include:

    • Calf stretches
    • Hamstring stretches
    • Quadriceps stretches
    • Shoulder stretches
    • Gentle hip movements
    • Controlled torso rotations

    Mobility exercises can also be included during warm-ups.

    Keep the movements comfortable and avoid forcing your range of motion.

    Create a Realistic Workout Length

    Your workout does not need to take a long time.

    A short, focused workout can be easier to maintain than a long session that leaves you exhausted.

    For example, a beginner might choose a 20- to 30-minute session.

    You can divide that time into:

    • Warm-up
    • Main exercises
    • Short breaks
    • Cool-down

    If you have more time on another day, you can make that session slightly longer.

    The best schedule is one that fits your normal life.

    Use a Warm-Up

    Before beginning a workout, spend a few minutes gradually preparing your body.

    A warm-up might include:

    • Walking
    • Marching in place
    • Arm circles
    • Shoulder rolls
    • Gentle squats
    • Easy lunges

    The warm-up should not leave you tired.

    Its purpose is to help you transition into exercise and prepare for the movements you are about to perform.

    Plan Your Exercises in Advance

    Knowing what exercises you will perform can make your workout more organized.

    For example, a simple full-body session could include:

    Exercise 1: Bodyweight squats

    Exercise 2: Incline push-ups

    Exercise 3: Reverse lunges

    Exercise 4: Glute bridges

    Exercise 5: Bird dogs

    Exercise 6: Plank

    You can adjust the number of sets and repetitions according to your fitness level.

    Do not feel that you have to complete every exercise if you become tired or your technique begins to suffer.

    Keep Track of Your Routine

    Writing down your workouts can help you understand your progress.

    You could record:

    • Date
    • Exercises
    • Sets
    • Repetitions
    • Exercise variations
    • How the session felt

    For example:

    Monday

    Squats — 2 sets

    Incline push-ups — 2 sets

    Glute bridges — 2 sets

    Bird dogs — 2 sets

    After several weeks, you can look back and see how your routine has changed.

    You may notice that an exercise that once felt difficult now feels more comfortable.

    Avoid Changing Everything at Once

    When people begin a new workout routine, they sometimes try to make too many changes at once.

    They may exercise more frequently, increase workout length, add many new exercises, and attempt difficult movements immediately.

    This can make the schedule difficult to maintain.

    Instead, change one part of your routine at a time.

    For example, you might first establish three weekly workouts. Once that habit feels comfortable, you can gradually introduce a new exercise or movement variation.

    Make Room for Other Activities

    Exercise should fit into your life rather than taking over your entire schedule.

    You may have school, homework, family responsibilities, hobbies, social activities, and time for relaxation.

    A good weekly schedule makes room for these things.

    You do not need to spend every free hour exercising.

    Rest and other activities are also part of maintaining a healthy routine.

    Have a Backup Plan

    Sometimes your planned workout will not be possible.

    You might have an unexpected responsibility, feel tired, or have less time than expected.

    Instead of abandoning the entire week, have a simple backup option.

    For example, if you planned a 30-minute workout but only have 10 minutes, you could perform a shorter session with a few basic exercises.

    You could also move the workout to another day.

    Being flexible can make it easier to maintain your routine over time.

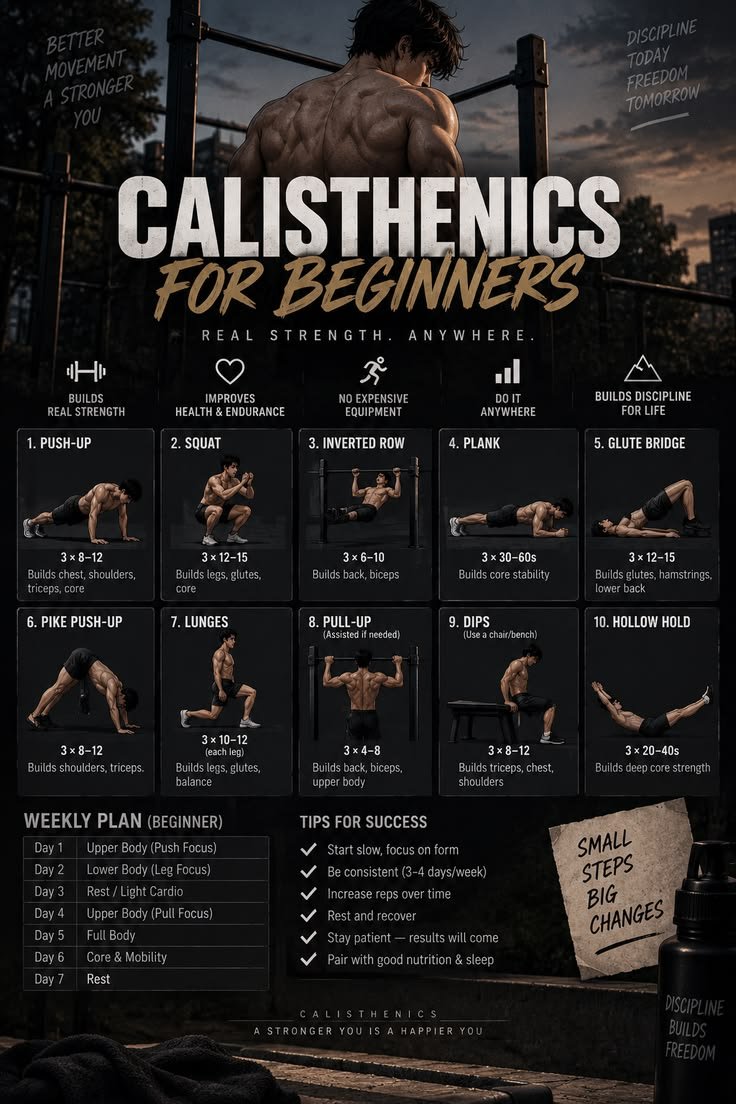
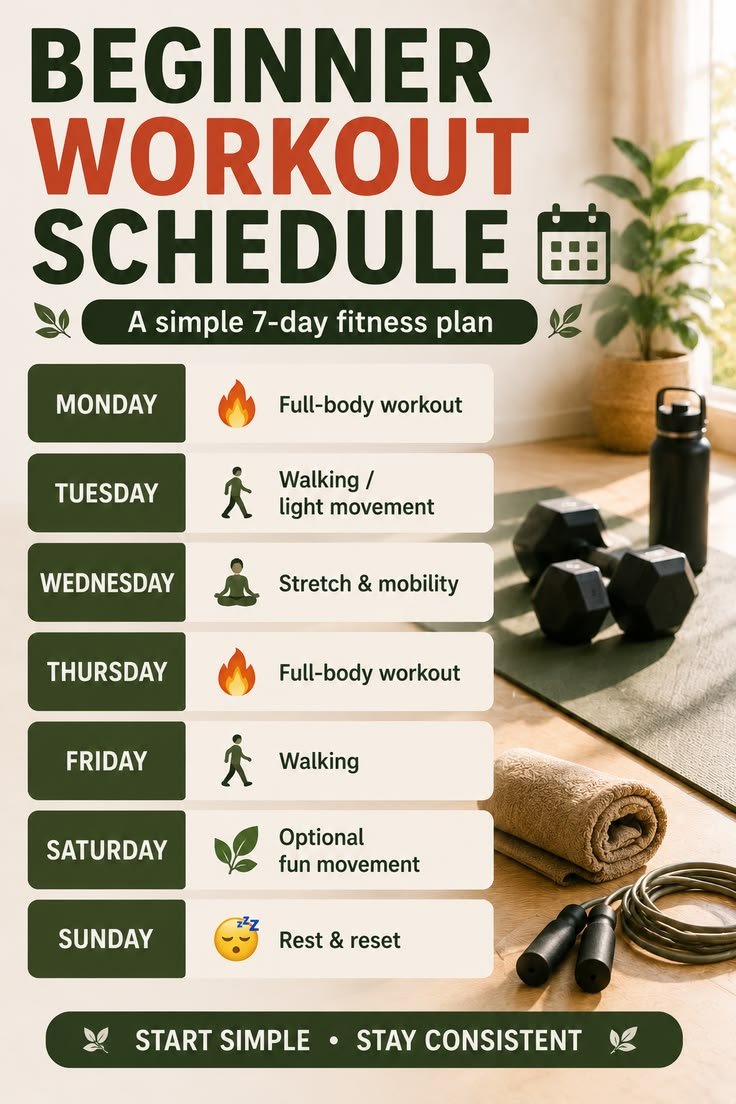
    Example Beginner Weekly Schedule

    Here is one simple example:

    Monday — Full-Body Strength

    Perform several beginner-friendly bodyweight exercises, followed by a short cool-down.

    Tuesday — Light Activity

    Take a comfortable walk or participate in another enjoyable activity.

    Wednesday — Full-Body Strength

    Repeat a basic strength routine using controlled movements.

    Thursday — Rest or Gentle Mobility

    Take a rest day or perform a few comfortable mobility exercises.

    Friday — Full-Body Strength

    Perform another manageable strength session.

    Saturday — Recreational Activity

    Choose something enjoyable, such as walking, cycling, dancing, or another suitable activity.

    Sunday — Rest

    Give your body time to recover.

    This schedule is only an example. Your own week can be arranged differently.

    Adjust Your Schedule When Needed

    A workout schedule should not be treated as something that can never change.

    If Monday becomes too busy, move the workout to Tuesday.

    If you are unusually tired, choose light activity or rest instead of forcing a demanding session.

    If an exercise causes pain, stop and choose another movement or seek appropriate advice.

    The ability to adjust your plan is an important part of creating a sustainable routine.

    Focus on Consistency

    Consistency does not mean exercising every single day.

    It means regularly making time for appropriate physical activity while allowing enough recovery.

    A simple routine performed regularly is often easier to maintain than an overly complicated schedule.

    You can start with a small number of sessions and gradually build from there.

    The important thing is to make exercise a normal part of your week without allowing it to interfere with necessary rest, school, work, or other responsibilities.

    Listen to Your Body

    Pay attention to how you feel before, during, and after exercise.

    Normal tiredness after activity is different from sharp pain or unusual symptoms.

    If you experience significant pain, dizziness, breathing difficulty, or another concerning symptom, stop exercising and seek help from a parent, guardian, coach, teacher, or qualified healthcare professional.

    Your workout schedule should support your well-being, not force you to exercise when your body needs attention or recovery.

    A weekly workout schedule works best when it is simple, flexible, and appropriate for your current fitness level. Start with manageable activities, include different types of movement, schedule rest days, and gradually adjust your routine as you gain experience.
  • How to Create a Weekly Workout Schedule

    How to Create a Weekly Workout Schedule

    Creating a weekly workout schedule can make exercise easier to organize and maintain. Instead of deciding what to do every time you want to exercise, you can plan your activities in advance and give yourself enough time for movement, rest, and recovery.

    A good workout schedule does not need to be complicated. Beginners can start with a few exercise sessions each week and gradually develop a routine that fits their daily responsibilities. The goal is to create a schedule that is realistic, balanced, and safe.

    Your schedule should also allow flexibility. Some days may be busy because of school, work, family activities, or other responsibilities. Missing or changing one workout does not mean you have failed. You can simply adjust the rest of the week.

    Start by Understanding Your Goals

    Before creating a weekly workout schedule, think about what you want exercise to help you achieve.

    Your goal might be to:

    • Improve general fitness
    • Develop physical strength
    • Improve flexibility
    • Become more active
    • Improve balance and coordination
    • Build better exercise habits
    • Support participation in a sport

    Your goals can help determine which activities you include.

    For example, someone interested in improving strength might include bodyweight exercises such as squats, push-ups, lunges, and planks. Someone interested in general fitness might combine strength exercises with walking, cycling, dancing, or another enjoyable activity.

    You do not need to choose only one goal. A balanced routine

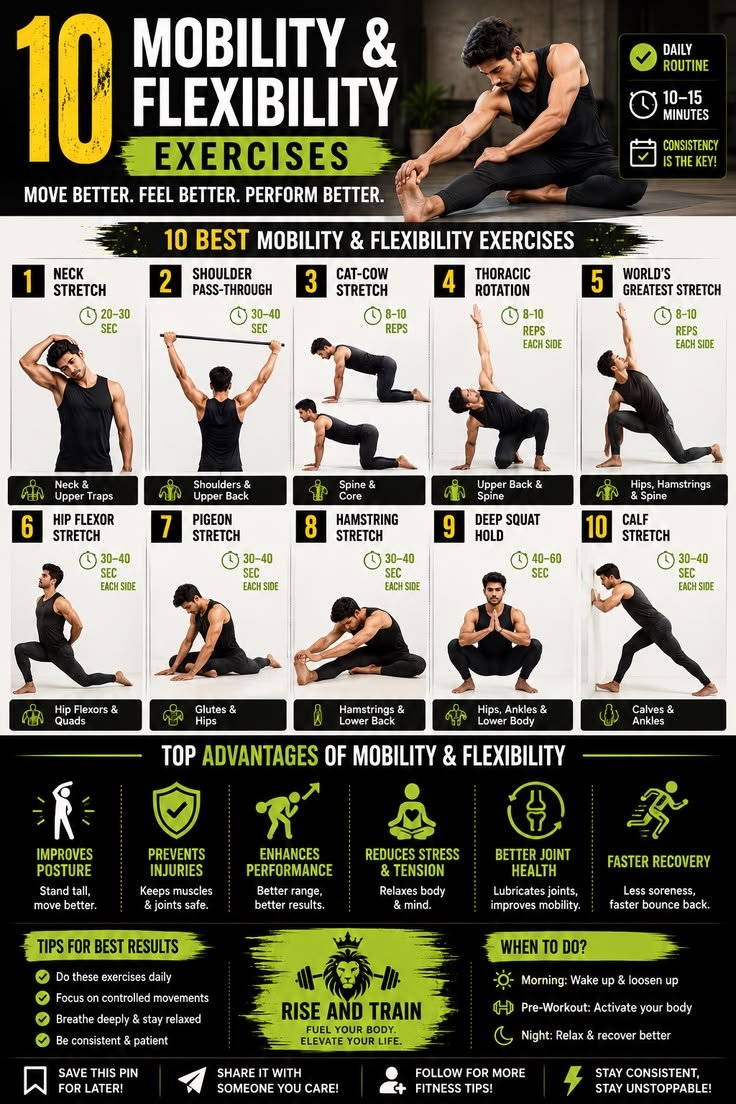
  • Best Exercises for Improving Flexibility

    Best Exercises for Improving Flexibility

    Flexibility is an important part of physical fitness. It allows your body to move comfortably through different ranges of motion and can make everyday activities and exercise easier to perform. Simple movements such as reaching overhead, bending down, walking, squatting, or turning your body all require some degree of mobility and flexibility.

    You do not need special equipment to work on your flexibility. Many useful flexibility exercises can be performed at home with enough space to move safely. The key is to practice consistently, use controlled movements, and avoid forcing your body into uncomfortable positions.

    Flexibility also develops gradually. Some people naturally have more flexibility than others, so it is not useful to compare your movement with someone else’s. Instead, focus on making your own movements more comfortable over time.

    What Is Flexibility?

    Flexibility is the ability of a muscle and joint to move through a particular range of motion.

    Different parts of the body have different levels of flexibility. For example, someone might have comfortable shoulder movement but find certain hip or hamstring movements more difficult.

    Flexibility can also vary depending on your activity level, habits, and previous movement experience.

    Regular stretching and mobility exercises can help you maintain or gradually improve your available range of motion.

    Why Is Flexibility Important?

    Good flexibility can support comfortable movement during everyday activities.

    For example, you may need flexibility when putting on shoes, reaching for something

  • Why Stretching Is Important After Exercise

    Why Stretching Is Important After Exercise

    Stretching is a common part of many exercise routines. After completing a workout, spending a few quiet minutes moving and stretching can be a useful way to transition from exercise back to normal daily activity. It can also help you pay attention to how your body feels after movement.

    Stretching does not need to be complicated. You can use simple movements that target the muscles you have used during your workout. The most important thing is to stretch gently and avoid forcing your body into uncomfortable positions.

    Whether you exercise at home, walk regularly, participate in sports, or follow a strength-training routine, learning how to stretch appropriately can make your overall exercise routine more comfortable and organized.

    What Is Stretching?

    Stretching involves moving a muscle or group of muscles into a position where you feel a gentle lengthening sensation.

    There are different types of stretching. One of the most familiar is static stretching, where you move into a comfortable position and hold it for a short period.

    For example, after exercising your legs, you might sit or stand and gently stretch one leg at a time.

    Another type is dynamic stretching, which involves controlled movement rather than holding one position. Dynamic movements are often useful before exercise because they help you prepare for activity.

    After exercise, gentle static stretching can be included as part of a cool-down routine.

    Stretching Can Help With Flexibility

    One of the main reasons people stretch is to support flexibility.

    Flexibility refers to the ability of your joints and muscles to move through an available range of motion.

    Regular gentle stretching may help you maintain or gradually improve your flexibility when practiced consistently.

    For example, if you regularly stretch your legs, you may become more comfortable performing movements that require a certain range of motion.

    However, flexibility develops gradually. You do not need to force a stretch or try to achieve an extreme range of motion.

    Stretching Can Help You Cool Down

    After a workout, your body may still feel active and warm. Moving gradually into a slower activity can provide a natural transition.

    You might begin by walking slowly for a few minutes and then perform several gentle stretches.

    This creates a simple cool-down routine.

    For example, after a home workout, you could walk around for two or three minutes before moving into comfortable stretches for the legs, hips, shoulders, and arms.

    The cool-down does not need to be long or complicated.

    Stretching Can Promote Body Awareness

    Exercise involves many different movements, and it can sometimes be difficult to notice how your body feels while you are concentrating on completing a workout.

    Stretching gives you an opportunity to slow down and pay attention.

    You may notice that your shoulders feel tense, your legs feel tired, or one side feels different from the other.

    This awareness can help you make better decisions about your next workout.

    If something feels unusual or painful, it is better to stop and seek appropriate advice rather than forcing yourself through the movement.

    Stretch the Muscles You Used

    A simple way to choose post-workout stretches is to consider the exercises you performed.

    If you completed a lower-body workout, you could focus on your legs and hips.

    If you performed upper-body exercises, you could include gentle shoulder, arm, and chest stretches.

    After a full-body workout, you can choose a few stretches that cover several areas.

    You do not need to stretch every muscle in your body after every workout.

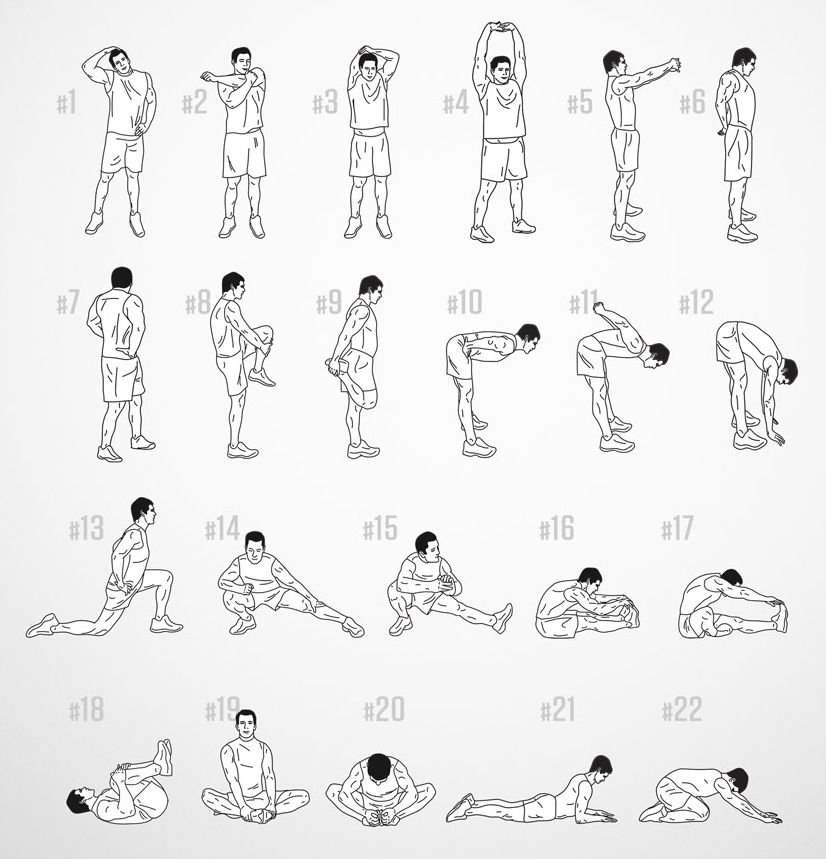
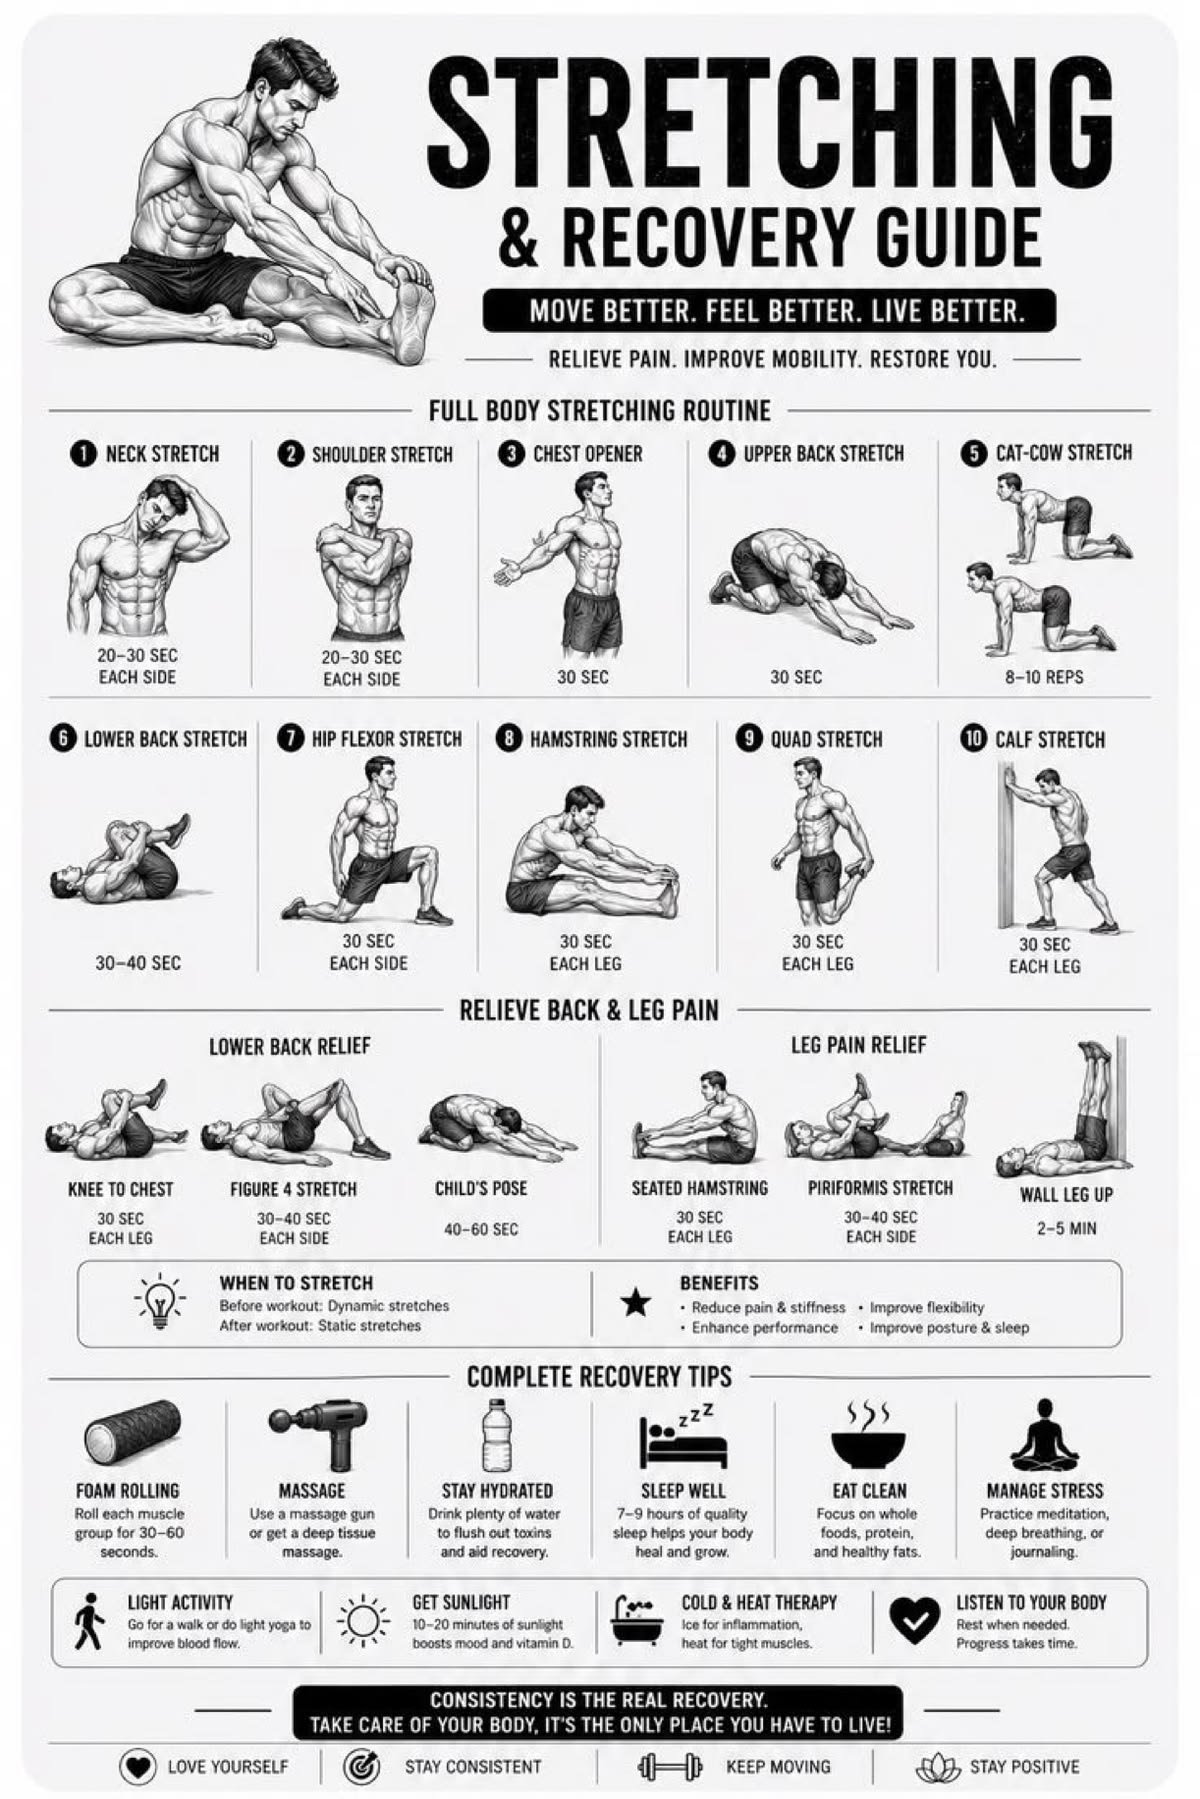
    Standing Quad Stretch

    The quadriceps are located at the front of the thighs.

    To perform a gentle standing quad stretch, stand near a stable surface if you need help with balance. Bend one knee and bring your foot toward the back of your body.

    Hold your foot only if you can do so comfortably. Keep your knees reasonably close together and avoid pulling aggressively.

    Hold the position for a short, comfortable period, then switch sides.

    If balancing on one leg is difficult, choose a seated version instead.

    Seated Hamstring Stretch

    The hamstrings are located at the back of the thighs.

    Sit on the floor with one leg extended and the other leg comfortably bent. Keep your back relaxed and slowly lean toward the extended leg.

    You do not need to touch your toes.

    The goal is to feel a gentle stretch behind the leg, not to force your body into a deep position.

    Switch sides when finished.

    Calf Stretch

    The calf muscles can receive a lot of work during walking, running, jumping, and lower-body exercises.

    To perform a simple calf stretch, stand facing a wall and place your hands against it.

    Move one foot behind you and keep that heel comfortably connected to the floor. Gently bend the front leg while keeping the back leg controlled.

    You should feel a gentle stretch around the calf of the back leg.

    Switch sides afterward.

    Gentle Shoulder Stretch

    After exercises such as push-ups or other upper-body movements, you can include gentle shoulder stretches.

    Bring one arm across your body and use the opposite arm to support it lightly.

    Do not pull aggressively.

    Hold the position comfortably, then switch arms.

    The movement should create a gentle stretching sensation around the shoulder and upper arm.

    Chest Stretch

    You can also gently stretch the chest after upper-body exercise.

    Stand near a doorway or another appropriate support. Place your forearm against the side of the doorway and gently turn your body away.

    Keep the movement comfortable.

    Do not force the shoulder backward.

    If the position causes pain, stop and choose another movement.

    Triceps Stretch

    The triceps are located at the back of the upper arm.

    To stretch them gently, raise one arm and bend the elbow so your hand moves toward the upper back.

    Use your other hand to provide very light support if needed.

    Keep your neck and shoulders relaxed.

    Switch arms after holding the position comfortably.

    Hip Stretch

    The hips are involved in many exercises, including squats, lunges, walking, and running.

    A simple seated hip stretch can be performed by sitting comfortably and positioning your legs in a way that allows a gentle stretch.

    You can also use a comfortable figure-four position if you are familiar with it.

    Do not force your knees or hips into a deep position. Choose a range that feels manageable.

    Lower-Back Movement

    It is important to be careful when stretching the lower back.

    Rather than forcing a deep forward bend, you can use gentle movements that allow the spine and hips to relax.

    For example, lying on your back and gently bringing one knee toward your chest can provide a comfortable movement for some people.

    Keep the movement easy and stop if it causes discomfort.

    How Long Should You Hold a Stretch?

    There is no need to hold a stretch for an extremely long time.

    A comfortable short hold can be enough for a basic post-workout routine. Many people find that holding a gentle stretch for around 15 to 30 seconds works well.

    The exact amount of time can vary depending on the exercise and your comfort level.

    More time is not automatically better. If you are uncomfortable, reduce the range of motion or stop the stretch.

    Never Force a Stretch

    One of the most important rules of stretching is to avoid forcing your body.

    You should generally feel gentle tension rather than sharp pain.

    Bouncing aggressively while holding a stretch is also unnecessary for a basic cool-down routine.

    Instead, move slowly into the position and remain relaxed.

    If a stretch feels too intense, reduce the movement.

    Breathe Normally

    Remember to breathe while stretching.

    Some people unintentionally hold their breath when concentrating on a movement.

    Try to breathe naturally and keep your body relaxed.

    Slow, regular breathing can make it easier to stay comfortable while holding a stretch.

    There is no need to use complicated breathing techniques.

    Stretching Should Match Your Fitness Level

    Beginners do not need advanced stretching routines.

    If you are new to exercise, start with a few basic movements that feel comfortable.

    As your flexibility and movement experience develop, you may become more comfortable with a wider range of exercises.

    Everyone has a different starting point. Comparing your flexibility with someone else’s is not necessary.

    Focus on your own movement and gradual progress.

    Stretching After Different Types of Exercise

    Different workouts may require different cool-down movements.

    After walking, you might focus on the calves, thighs, and hips.

    After a lower-body strength workout, you might stretch the quadriceps, hamstrings, calves, and hips.

    After an upper-body workout, you might focus on the shoulders, chest, arms, and upper back.

    After a full-body workout, choose several simple stretches that cover the main areas you used.

    This makes your cool-down more relevant to the workout.

    A Simple Post-Workout Stretching Routine

    You can create a basic routine using several simple stretches.

    For example:

    1. Standing quad stretch: 15–30 seconds per side.

    2. Seated hamstring stretch: 15–30 seconds per side.

    3. Calf stretch: 15–30 seconds per side.

    4. Shoulder stretch: 15–30 seconds per side.

    5. Chest stretch: 15–30 seconds.

    6. Gentle triceps stretch: 15–30 seconds per side.

    You can adjust the routine depending on the workout you completed.

    If you are short on time, choose only the stretches that relate most closely to the exercises you performed.

    Stretching Is Only One Part of Recovery

    Stretching can be useful, but recovery involves more than stretching.

    Your body also needs adequate rest, regular meals, fluids, and sleep.

    If you have completed a challenging workout, avoid immediately starting another demanding session without giving yourself enough recovery time.

    A balanced routine includes exercise as well as rest.

    When to Stop Stretching

    A gentle stretching sensation is different from pain.

    If you experience sharp pain, numbness, tingling, dizziness, or another unusual symptom, stop the exercise.

    If discomfort continues or you are concerned about an injury, speak with a parent, guardian, coach, teacher, or qualified healthcare professional.

    There is no benefit in forcing a stretch when something feels wrong.

    Make Stretching a Regular Habit

    You do not have to spend a long time stretching after every workout.

    A few simple movements can be enough to create a consistent cool-down habit.

    The key is to keep the routine comfortable and appropriate for your activity level.

    Over time, regular gentle stretching can become a natural part of your exercise routine. It can give you a few quiet minutes to slow down, notice how your body feels, and transition from exercise back into the rest of your day.

  • Best Warm-Up Exercises Before a Workout

    Best Warm-Up Exercises Before a Workout

    A warm-up is an important part of preparing for exercise. Whether you are working out at home, training outdoors, or taking part in a sport, spending a few minutes preparing your body can help you move more comfortably during your workout.

    A good warm-up does not need to be complicated. You do not need expensive equipment or a long list of exercises. Simple movements such as walking, marching, arm circles, bodyweight squats, and gentle lunges can be enough to prepare you for many types of exercise.

    The main purpose of a warm-up is to gradually prepare your body for the activity ahead. It can increase movement, help you focus on your technique, and allow you to begin your workout at a comfortable pace.

    What Is a Warm-Up?

    A warm-up is a short period of light activity performed before more demanding exercise.

    For example, if you plan to do a strength workout, you could begin with several

  • How to Improve Your Physical Strength at Home

    How to Improve Your Physical Strength at Home

    Improving physical strength does not always require a gym or expensive equipment. With a simple home exercise routine, you can gradually become stronger by using your own body weight and everyday movements. The most important things are consistency, good technique, enough recovery, and gradual progress.

    Physical strength is useful for many daily activities. It can make it easier to carry objects, climb stairs, maintain good posture, and perform sports or recreational activities. Building strength can also help you develop better control over your movements and improve general fitness.

    If you are exercising at home, you do not need to start with difficult exercises. Beginners can make progress by learning basic movements and slowly increasing the challenge as they become more comfortable.

    Start With Basic Bodyweight Exercises

    Bodyweight exercises are a convenient way to begin strength training at home. They use your body as resistance and can be adjusted for different fitness levels.

    Some useful beginner exercises include:

    • Squats
    • Wall push-ups
    • Incline push-ups
    • Lunges
    • Glute bridges
    • Step-ups
    • Calf raises
    • Planks
    • Bird dogs
    • Wall sits

    These movements train different areas of the body while also helping you learn basic exercise techniques.

    For example, squats involve the legs and hips, while push-ups train the muscles used for pushing. Planks and bird dogs help develop core control. Using several different movements gives your workout more variety.

    Learn Proper Technique First

    One of the most important parts of becoming stronger is learning how to perform exercises correctly. Adding more repetitions is not useful if your technique becomes uncontrolled.

    Take squats as an example. Stand with your feet in a comfortable position, keep your upper body controlled, bend your knees and hips, and lower yourself only as far as you can comfortably manage while maintaining good form. Then return to the starting position.

    For push-ups, keep your body controlled as you lower and raise yourself. If a regular push-up is too difficult, begin with your hands against a wall or on a stable elevated surface.

    Good technique allows you to practice the movement safely and consistently. It also makes it easier to measure your progress.

    Use Easier Versions When Necessary

    Strength training is not about immediately performing the hardest version of an exercise.

    If you cannot perform a standard push-up comfortably, start with wall push-ups. Once those become easier, you can try incline push-ups. After developing more strength and control, you may gradually work toward floor push-ups.

    The same idea can be applied to other movements.

    For example:

    Squat progression:

    Chair squat → bodyweight squat → slower squat → more challenging squat variation

    Push-up progression:

    Wall push-up → incline push-up → knee push-up → standard push-up

    The exact progression will depend on your current ability. There is no need to rush from one level to another.

    Train Different Movement Patterns

    A balanced home workout should include different types of movements rather than focusing on only one exercise.

    You can include exercises that involve:

    • Squatting
    • Pushing
    • Lunging
    • Hip movement
    • Core stabilization
    • Stepping
    • Calf movement

    Squats and lunges challenge the lower body. Push-ups develop pushing strength. Glute bridges train the muscles around the hips. Planks and bird dogs develop control through the trunk.

    Using different movements helps create a more complete routine.

    Practice Squats

    Squats are one of the simplest exercises for developing lower-body strength at home.

    To perform a basic bodyweight squat, stand with your feet at a comfortable width. Keep your chest naturally upright and begin bending your hips and knees. Lower yourself in a controlled manner and then push through your feet to return to standing.

    Start with a manageable number of repetitions. Focus on smooth movement rather than speed.

    If regular squats feel difficult, you can practice sitting down and standing up from a sturdy chair. This provides an easy way to learn the movement.

    Add Lunges

    Lunges are another useful bodyweight exercise. They challenge the legs while also requiring balance and coordination.

    Start from a standing position. Step one foot forward and lower your body in a controlled way. Then push through your feet to return to the starting position.

    Beginners can hold onto a stable surface if they need additional balance.

    You can also practice reverse lunges, where you step backward instead of forward. Choose the variation that allows you to maintain control.

    Develop Pushing Strength

    Push-ups are a popular home exercise because they require very little space or equipment.

    However, standard push-ups can be challenging for beginners. Starting with an easier variation is completely acceptable.

    Wall push-ups are one option. Stand facing a wall, place your hands against it, bend your elbows to move closer to the wall, and then push yourself away.

    As you become more comfortable, you can move to an incline surface such as a sturdy table or bench designed to support your weight. Make sure the surface is stable before exercising.

    Gradually progressing toward more difficult variations can help improve pushing strength without making the workout unnecessarily difficult.

    Strengthen the Hips With Glute Bridges

    Glute bridges are performed while lying on your back with your knees bent and feet placed on the floor.

    Press your feet into the floor and gently lift your hips. Pause briefly at the top, then lower your hips in a controlled way.

    This exercise works the muscles around the hips and also teaches you to control the movement of your pelvis.

    You can include glute bridges as part of a lower-body or full-body home workout.

    Build Core Strength

    A strong core is useful for maintaining control during many different movements. You do not need complicated exercises to work your core.

    Planks are a common option. Instead of trying to hold a plank for an extremely long time, focus on maintaining a controlled position for a manageable period.

    Bird dogs are another beginner-friendly exercise. Start on your hands and knees, then slowly extend one arm and the opposite leg. Return them to the starting position and switch sides.

    The goal is controlled movement rather than speed.

    Use Step-Ups

    If you have a safe, stable step that is specifically suitable for exercise, step-ups can be useful for developing lower-body strength and coordination.

    Place one foot on the step and carefully step up. Bring the other foot up, then step down with control.

    Use a low height when beginning. Make sure the surface is stable and there is enough space around you.

    If you do not have a suitable step, there is no need to force the exercise into your routine. Squats, lunges, and other movements can provide alternatives.

    Increase Difficulty Gradually

    One of the main principles of strength training is progressive overload. In simple terms, your exercises need to become gradually more challenging over time.

    You can increase difficulty in several ways.

    For example, you might:

    • Add a few repetitions
    • Perform the movement more slowly
    • Improve your range of motion
    • Use a more challenging exercise variation
    • Add another set when appropriate
    • Reduce unnecessary rest slightly

    You do not need to change everything at once.

    If you perform ten controlled squats comfortably today, you might gradually work toward a slightly greater challenge over time. Small improvements can add up.

    Do Not Exercise Hard Every Day

    Recovery is an important part of getting stronger.

    Your body needs time to recover after exercise. Training the same muscles intensely every day may leave you tired and can make it harder to maintain good technique.

    A beginner can often start with a few strength sessions each week rather than trying to exercise intensely every day.

    On other days, you can focus on normal daily activity, gentle movement, mobility, or rest.

    The right schedule depends on your fitness level and how your body responds to training.

    Warm Up Before Exercise

    A short warm-up can prepare you for your workout.

    You can begin with a few minutes of easy movement, such as walking around the room. Follow this with gentle dynamic movements that prepare the joints and muscles for the exercises you plan to perform.

    For example, before a lower-body workout, you might practice controlled bodyweight squats and gentle leg movements.

    A warm-up does not need to be exhausting. Its purpose is to prepare you for the session.

    Pay Attention to Recovery

    Exercise is only one part of improving physical strength. Recovery matters too.

    Try to maintain a regular sleep schedule and give your body enough time to rest between challenging workouts. Eating regular, balanced meals also provides your body with energy and nutrients needed for normal activity and recovery.

    You do not need complicated diets or special products to begin strength training. Focus on regular meals, a variety of nutritious foods, and enough fluids.

    Create a Simple Weekly Routine

    A simple routine can make it easier to stay consistent.

    For example, a beginner might organize a week like this:

    Day 1: Full-body strength workout

    Day 2: Light activity or rest

    Day 3: Full-body strength workout

    Day 4: Light activity or rest

    Day 5: Full-body strength workout

    Day 6: Easy movement or recreational activity

    Day 7: Rest

    The exact schedule can be adjusted around school, work, family activities, and other responsibilities.

    The goal is to create a routine that you can maintain rather than making your schedule unnecessarily difficult.

    Keep Track of Your Progress

    Tracking your workouts can help you notice improvements that might otherwise be easy to miss.

    You could write down the exercises you performed, the number of repetitions, how many sets you completed, and which variation you used.

    For example:

    • Squat — 2 sets of 10
    • Incline push-up — 2 sets of 8
    • Glute bridge — 2 sets of 10
    • Bird dog — 2 sets per side
    • Plank — short controlled holds

    After several weeks, you may notice that exercises feel easier or that you can perform a more challenging variation with better control.

    Progress is not always about doing more repetitions. Better technique and improved control are also useful signs of progress.

    Avoid Common Training Mistakes

    Several mistakes can make home strength training less effective.

    One common mistake is trying to progress too quickly. If an exercise is difficult, rushing into a harder version can make it harder to maintain proper technique.

    Another mistake is doing only one type of exercise. A routine that includes different movements can provide more balanced training.

    Some people also ignore recovery. Being consistent does not mean exercising as hard as possible every day.

    Finally, avoid exercising through sharp or unusual pain. Stop the movement and, if pain continues or concerns you, speak with a parent, guardian, coach, teacher, or qualified healthcare professional.

    Make Strength Training Enjoyable

    The best home workout is one that you can perform consistently and safely.

    You can keep your routine interesting by changing exercises occasionally, learning new movement variations, or combining strength exercises with activities you enjoy.

    You can also exercise with a friend or family member if that makes the activity more enjoyable.

    Strength development is a gradual process. You do not need to measure yourself against another person. Focus on learning movements, practicing consistently, and noticing your own progress over time.

    With basic exercises, proper technique, gradual progression, and enough recovery, home strength training can become a useful part of a healthy and active lifestyle.

  • Best Calisthenics Exercises for Beginners

    Best Calisthenics Exercises for Beginners

    Calisthenics is a form of exercise that mainly uses your own body weight for resistance. It can be practiced at home, outdoors, or in a simple workout space without needing a large collection of equipment. For beginners, calisthenics can be a practical way to learn basic movement patterns while developing strength, balance, coordination, and body control.

    You do not need to be advanced to start calisthenics. Many exercises have beginner-friendly versions that can be adjusted according to your current ability. Starting with simple movements allows you to learn proper technique before gradually moving toward more challenging exercises.

    A good beginner routine does not need to contain complicated movements. Exercises such as squats, push-ups, lunges, planks, and glute bridges can provide a useful foundation.

    What Is Calisthenics?

    Calisthenics uses bodyweight movements to develop physical abilities. Instead of relying mainly on machines or heavy weights, you use your body as resistance.

    Some calisthenics exercises are very simple, while others can become highly advanced. Beginners should focus on basic exercises before attempting difficult movements.

    The main skills developed through beginner calisthenics include strength, balance, mobility, coordination, and control.

    1. Bodyweight Squats

    Bodyweight squats are one of the best starting exercises for beginners.

    Stand with your feet around hip width apart. Keep your feet stable and your upper body comfortable.

    Bend your knees and hips while lowering your body as if you were sitting down. Keep your movement controlled.

    Once you reach a comfortable depth, push through your feet to return to standing.

    Squats train the legs and hips while also requiring core stability.

    If regular squats are difficult, you can practice chair squats by lowering yourself toward a stable chair.

    2. Wall Push-Ups

    Wall push-ups are an excellent starting point for learning the push-up movement.

    Stand facing a wall and place your hands against it around chest height.

    Step your feet slightly backward and keep your body aligned.

    Bend your elbows to bring your chest toward the wall. Then push through your hands to return to the starting position.

    Wall push-ups are generally easier than floor push-ups, making them useful for beginners.

    As you become more comfortable, you can progress to incline push-ups.

    3. Incline Push-Ups

    Incline push-ups are performed with your hands on a stable elevated surface.

    Keep your body straight and lower your chest toward the surface by bending your elbows.

    Then push yourself back up.

    The height of the surface affects the difficulty. A higher surface generally makes the exercise easier.

    Make sure the surface is stable before starting.

    4. Knee Push-Ups

    Knee push-ups can help beginners practice the push-up movement while reducing the amount of bodyweight being moved.

    Start on your hands and knees.

    Position your hands comfortably and keep your body controlled from your head toward your knees.

    Lower your chest toward the floor and push back up.

    Focus on maintaining control rather than trying to complete a large number of repetitions.

    5. Standard Push-Ups

    Once you are comfortable with easier variations, you can practice standard push-ups.

    Start in a high plank position with your hands around shoulder width apart.

    Keep your body aligned while bending your elbows and lowering your chest toward the floor.

    Then push through your hands to return to the starting position.

    If your technique becomes difficult, return to an easier variation.

    6. Reverse Lunges

    Reverse lunges are a useful beginner lower-body exercise.

    Start standing with your feet comfortably apart.

    Step one foot backward and lower your body by bending both knees.

    Push through the front foot to return to standing.

    Then switch sides.

    Reverse lunges can be easier for some beginners to control than forward lunges because the backward step allows you to establish your position before lowering.

    Use a wall for balance if needed.

    7. Glute Bridges

    Glute bridges are performed on the floor and require no equipment.

    Lie on your back with your knees bent and your feet flat on the floor.

    Keep your arms beside your body.

    Press through your feet and lift your hips from the floor.

    Pause briefly at the top and lower your hips slowly.

    The exercise involves the hips and also requires the core to help stabilize the movement.

    8. Bird Dogs

    Bird dogs are useful for developing balance and body control.

    Start on your hands and knees.

    Extend one arm forward while extending the opposite leg backward.

    Try to keep your hips and shoulders stable.

    Hold briefly, return to the starting position, and switch sides.

    You do not need to extend your arm and leg extremely high.

    A controlled movement is more important than reaching a large range.

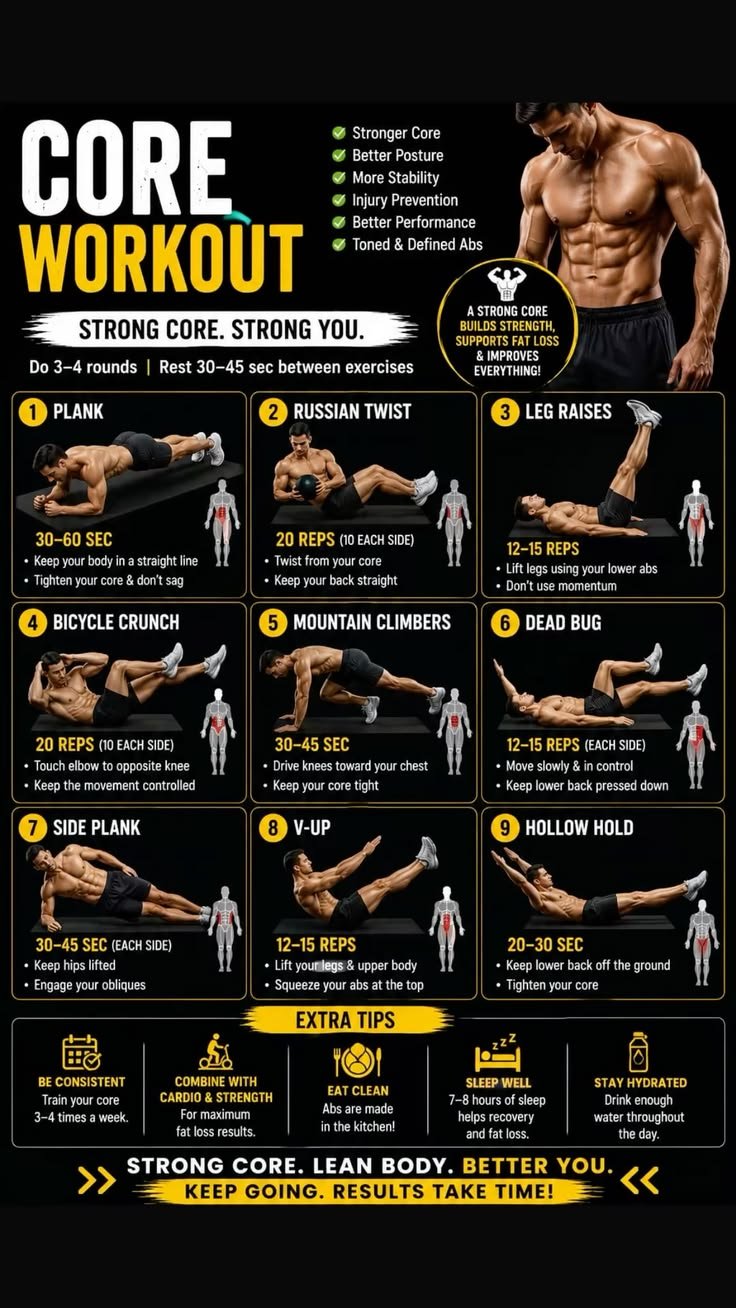
    9. Planks

    Planks are a simple bodyweight exercise for core stability.

    Start in a high plank position or use your forearms.

    Keep your body aligned and engage your core gently.

    Hold the position for a manageable amount of time.

    Beginners can perform a modified plank with their knees on the floor.

    There is no need to hold a plank for a very long period. Focus on maintaining good form.

    10. Side Planks

    Side planks challenge the muscles that help stabilize the sides of the body.

    Lie on your side and support yourself with your forearm.

    Keep your knees bent if you need an easier version.

    Lift your hips and maintain a controlled position.

    Hold briefly, lower yourself, and switch sides.

    As your strength improves, you can gradually practice a version with your legs extended.

    11. Calf Raises

    Calf raises are a simple lower-leg exercise.

    Stand with your feet comfortably apart.

    Slowly raise your heels so that you are standing on the balls of your feet.

    Pause briefly and lower your heels.

    Use a wall or another stable surface for balance if needed.

    You can perform calf raises slowly to improve control.

    12. Step-Ups

    Step-ups can be performed using a stable, low step or platform.

    Place one foot on the surface and carefully step upward.

    Bring the other foot up and then step down in a controlled way.

    Alternate legs or complete several repetitions on one side before switching.

    Make sure the surface is stable and not slippery.

    Choose a height that you can use safely and comfortably.

    13. Superman Exercise

    The Superman exercise can be used to practice back and hip control.

    Lie face down with your arms extended forward.

    Gently lift your arms and legs a small distance from the floor.

    Hold briefly and slowly lower them.

    Do not force the movement or try to lift extremely high.

    If you feel discomfort in your back, reduce the range or choose another exercise.

    14. Mountain Climbers

    Mountain climbers combine core stability with leg movement.

    Start in a high plank position.

    Bring one knee toward your chest and return it to the starting position.

    Then switch legs.

    Beginners should perform the movement slowly enough to maintain control.

    You do not need to turn mountain climbers into a fast exercise. Controlled repetitions can help you learn the movement.

    15. Bear Crawl

    The bear crawl is a bodyweight movement that requires coordination between the arms, legs, and core.

    Start on your hands and knees.

    Lift your knees slightly from the floor while keeping your back controlled.

    Move one hand and the opposite foot forward, then switch sides.

    Start with small movements.

    If the exercise feels too difficult, practice holding the bear position without moving.

    16. Dead Bug

    The dead bug is a beginner-friendly core exercise.

    Lie on your back with your arms raised and your knees bent.

    Slowly lower one arm and the opposite leg while keeping your trunk stable.

    Return to the starting position and switch sides.

    Move slowly and avoid allowing your lower back to move excessively.

    If the full movement is difficult, reduce the range of motion.

    How to Build a Beginner Calisthenics Routine

    You do not need to perform all of these exercises in one workout.

    Choose several movements that cover different areas of the body.

    For example, a beginner routine could include:

    • Bodyweight squats
    • Incline push-ups
    • Reverse lunges
    • Glute bridges
    • Bird dogs
    • Planks

    This routine covers the legs, upper body, hips, and core.

    Start with a manageable amount of work and take breaks between exercises.

    Focus on Movement Quality

    Calisthenics is about controlling your body.

    Beginners sometimes focus too much on completing as many repetitions as possible. Instead, concentrate on performing each repetition with good technique.

    For example, during a squat, keep your feet stable and control the lowering phase.

    During a push-up, keep your body aligned and avoid rushing.

    During a plank, stop when you can no longer maintain a stable position.

    Good technique gives you a stronger foundation for future progress.

    How to Progress in Calisthenics

    Progression does not always mean performing more repetitions.

    You can progress by moving from an easier variation to a more challenging one.

    For example:

    Wall push-up → incline push-up → knee push-up → standard push-up.

    For squats, you might begin with chair squats before progressing to regular bodyweight squats.

    For planks, you can begin with a modified version and gradually move toward a standard plank.

    You can also improve your control, range of motion, or exercise consistency.

    Warm Up Before Training

    A short warm-up can prepare your body for calisthenics.

    Start with light movement such as walking.

    You can then perform gentle arm circles, hip movements, ankle movements, and a few easy repetitions of the first exercise.

    A warm-up should prepare you without making you tired.

    If a movement causes discomfort during your warm-up, choose an easier alternative.

    Allow Time for Recovery

    Your body needs recovery after exercise.

    You do not need to perform difficult calisthenics workouts every day.

    You can alternate training days with lighter activities such as walking or gentle mobility exercises.

    Rest also gives you time to improve your movement quality before your next challenging workout.

    Common Beginner Mistakes

    One common mistake is attempting advanced calisthenics movements too early.

    Exercises such as handstands, difficult muscle-up progressions, and other advanced skills require preparation and should not be rushed.

    Another mistake is comparing your progress with other people.

    Everyone begins with different levels of strength, coordination, and experience.

    Focus on improving your own technique and learning exercises gradually.

    Another mistake is ignoring recovery. Training harder does not automatically mean making better progress.

    Make Calisthenics Part of Your Routine

    One advantage of calisthenics is that many exercises can be performed with very little equipment.

    You can practice basic movements at home or in an appropriate outdoor space.

    The important thing is to create a routine that is realistic for your schedule.

    You might perform a short full-body workout several times during the week rather than trying to complete a very long session.

    Consistency makes it easier to develop exercise habits.

    Safety During Beginner Calisthenics

    Use a clear and stable area for your workouts.

    If an exercise requires a surface such as a chair, step, or elevated platform, make sure it is stable before using it.

    Do not force a movement beyond your current ability.

    If you experience sharp or unusual pain, stop the exercise.

    If you have an existing injury or health concern, consider getting advice from a healthcare professional before starting a new exercise routine.

    Calisthenics should be a gradual process. Start with movements you can control, practice them regularly, and increase difficulty only when you are ready.

  • How to Do Squats Correctly

    How to Do Squats Correctly

    Squats are one of the most useful bodyweight exercises for beginners. They are simple to learn, require little space, and can be performed without special equipment. Squats train several muscles around the legs and hips while also requiring you to control your body through a basic movement pattern.

    You use a movement similar to a squat in everyday activities such as sitting down, standing up, picking something up from a low position, and climbing stairs. Learning to squat with good technique can therefore be useful both during exercise and during normal daily activities.

    The most important part of learning squats is not how many repetitions you can perform. Instead, beginners should focus on comfortable movement, control, balance, and gradually improving their technique.

    What Is a Squat?

    A squat involves bending your knees and hips to lower your body before pushing through your feet to return to a standing position.

    The movement involves several areas of the body, including the thighs, hips, and core. Your ankles and feet also contribute to maintaining balance.

    A bodyweight squat is a good starting point because you can focus on technique without needing weights.

    Step 1: Stand in a Comfortable Position

    Begin by standing with your feet approximately hip-width apart.

    Some people prefer a slightly wider stance, while others feel more comfortable with their feet closer together.

    Your toes can point forward or slightly outward.

    There is no need to force your feet into one exact position. Choose a stance that allows you to squat comfortably while keeping your feet stable.

    Stand upright and relax your shoulders.

    Step 2: Prepare Your Core

    Before lowering into the squat, gently engage your core.

    You do not need to tighten your stomach as hard as possible. Simply create enough tension to help keep your body stable.

    Keep your chest in a comfortable position and look forward or slightly downward.

    Avoid lifting your chin excessively.

    Step 3: Start by Moving Your Hips and Knees

    Begin the movement by bending your hips and knees.

    Think about lowering yourself as if you were going to sit on a chair.

    Your hips will move backward while your knees bend.

    Keep your feet firmly connected to the floor.

    Your heels should not lift unnecessarily during a normal bodyweight squat.

    Step 4: Lower Under Control

    Continue lowering your body until you reach a comfortable depth.

    Your knees should move naturally in the same general direction as your toes.

    You do not need to force your knees outward or inward.

    The depth of your squat can depend on your mobility, strength, and comfort.

    A beginner may start with a smaller range of motion and gradually increase it with practice.

    Step 5: Keep Your Feet Stable

    Throughout the squat, keep your feet connected to the floor.

    Try to maintain contact through the heel and the front part of the foot.

    If your feet begin to roll excessively inward or your heels lift, reduce the depth and work on your positioning.

    Stable feet provide a good foundation for the rest of the movement.

    Step 6: Stand Back Up

    Once you reach a comfortable depth, push through your feet to return to standing.

    Straighten your hips and knees in a controlled manner.

    Avoid jumping or using unnecessary momentum.

    Finish the repetition in a comfortable standing position.

    That completes one bodyweight squat.

    Common Squat Mistakes

    Going Too Fast

    One of the most common mistakes is rushing through repetitions.

    Moving quickly can make it harder to control your knees, hips, and feet.

    Instead, try lowering yourself smoothly and standing up under control.

    Knees Moving Inward

    Some beginners allow their knees to collapse inward during the squat.

    Try to keep your knees moving generally in the same direction as your toes.

    You do not need to push them extremely outward.

    Heels Lifting

    Your heels should generally stay connected to the floor during a basic bodyweight squat.

    If your heels lift, try reducing the depth or checking your stance.

    Limited ankle mobility can also affect how comfortably you squat.

    Bending Too Far Forward

    Your upper body does not need to remain perfectly vertical during a squat.

    Some forward movement of the torso is normal.

    However, avoid collapsing forward or losing control of your posture.

    Keep your chest in a comfortable position and maintain control throughout the movement.

    Going Deeper Than You Can Control

    There is no requirement to squat as low as possible.

    If you lose balance or technique at a particular depth, reduce the range of motion.

    You can gradually work toward a deeper squat as your mobility and strength improve.

    Chair Squats for Beginners

    A chair can help beginners learn the basic squat pattern.

    Stand in front of a stable chair with your feet comfortably apart.

    Slowly lower your hips toward the chair as if you are going to sit down.

    Lightly touch the chair with your hips, then push through your feet to stand.

    You do not need to sit completely down between every repetition.

    Make sure the chair is stable and placed on a surface where it will not easily slide.

    Wall Squats

    Wall squats can provide additional support while you learn to control the movement.

    Stand with your back against a wall and your feet a comfortable distance forward.

    Slowly bend your knees and slide your back down the wall.

    Only lower as far as you can comfortably control.

    Then push through your feet and return to the starting position.

    This variation can be useful for beginners who have difficulty maintaining balance during regular squats.

    Half Squats

    A half squat uses a smaller range of motion than a deeper squat.

    Lower your body partway, then return to standing.

    This can be a useful starting point if a full squat feels difficult.

    As your control improves, you can gradually increase the range of motion.

    There is no need to rush this progression.

    Squat to Calf Raise

    Once you are comfortable with basic squats, you can combine the movement with a calf raise.

    Perform a normal squat and return to standing.

    At the top, slowly rise onto the balls of your feet and then lower your heels.

    This combines two simple lower-body movements.

    Keep your movements controlled and use a wall or other stable support if you need help with balance.

    Squat With a Pause

    A pause squat involves stopping briefly at the bottom of a comfortable squat.

    Lower yourself under control and pause for a short moment.

    Then push through your feet to stand.

    The pause removes some momentum and gives you an opportunity to practice stability.

    If the pause makes the exercise too difficult, return to regular squats.

    How to Breathe During Squats

    Try to breathe naturally while squatting.

    Many people find it comfortable to breathe in while lowering and breathe out while standing.

    You do not need to force a particular breathing pattern.

    The important thing is to avoid unnecessary breath-holding and maintain relaxed, controlled breathing.

    How Many Squats Should Beginners Do?

    There is no single number that works for everyone.

    A beginner should choose an amount that can be performed with good technique.

    You might start with a small number of controlled repetitions and rest between sets.

    If you notice your technique becoming less controlled, stop the set.

    Over time, you can gradually increase the number of repetitions or choose a more challenging variation.

    The goal is steady progress rather than exhausting yourself during every workout.

    How Often Should You Practice Squats?

    Squats can be included in a regular exercise routine, but your muscles still need time to recover.

    You do not need to perform challenging squat workouts every day.

    You can alternate lower-body training with upper-body exercises, walking, mobility work, or rest.

    This allows you to build a balanced routine without repeatedly stressing the same muscles.

    Warm Up Before Squats

    A short warm-up can prepare your body for squatting.

    You can begin with a few minutes of light walking or another easy activity.

    Then perform gentle movements such as leg swings, ankle movements, or a few easy chair squats.

    The goal is to gradually prepare your body rather than make yourself tired before the main workout.

    How to Improve Your Squat

    Improving your squat is a gradual process.

    First, focus on maintaining stable feet and controlled movement.

    Then work on your balance and range of motion.

    You can also practice chair squats or wall squats if you need additional support.

    As you become more comfortable, you can perform regular bodyweight squats with a slightly greater range of motion.

    Eventually, you may choose more challenging variations, but there is no need to rush.

    Squat Progressions for Beginners

    A simple progression could look like this:

    1. Chair squat
    2. Supported squat
    3. Half squat
    4. Regular bodyweight squat
    5. Pause squat
    6. More challenging bodyweight variations

    You do not have to follow this exact order.

    Everyone develops strength and coordination at a different pace.

    Stay with an easier variation until you can perform it comfortably and consistently.

    Combine Squats With Other Exercises

    Squats are only one movement in a complete fitness routine.

    You can combine them with exercises for the upper body, core, and cardiovascular fitness.

    For example, a simple home workout could include:

    • Bodyweight squats
    • Incline push-ups
    • Bird dogs
    • Glute bridges
    • Light walking

    This gives you a broader range of movement while keeping the workout simple.

    Protect Your Knees and Hips

    Good squat technique involves more than simply thinking about your knees.

    Keep your feet stable, move at a controlled pace, and choose a range of motion that you can comfortably manage.

    If you experience pain in your knees or hips, stop the exercise and reassess your technique.

    You can try a smaller range of motion or an easier variation.

    Persistent or significant pain should be discussed with an appropriate healthcare professional.

    Do Not Compare Your Squat With Other People

    Everyone has different levels of mobility, strength, coordination, and experience.

    One person may naturally squat deeper than another person.

    This does not mean that you need to copy their exact movement.

    Focus on your own technique and gradually improve your ability.

    A controlled squat performed at a comfortable depth is a useful starting point.

    Make Squats Part of a Balanced Routine

    Squats are easy to include in a home workout because they require no special equipment.

    You can practice them during a full-body workout, as part of a lower-body session, or during a short movement break.

    Keep your routine manageable.

    Regular practice with good technique can help you become more comfortable with the movement over time.

    If you are new to exercise, have an injury, or experience ongoing pain, consider getting guidance from a qualified coach, physical education professional, or healthcare professional before starting a new exercise program.

  • Best Back Exercises for Beginners

    Best Back Exercises for Beginners

    The back plays an important role in everyday movement. It helps support the body, maintain posture, and work with the shoulders, arms, hips, and core during many activities. Building basic back strength can make it easier to perform everyday movements with good control.

    You do not need a gym or expensive equipment to begin training your back. Several simple exercises can be performed at home using bodyweight and controlled movements. For beginners, the main goal should be learning proper movement, improving strength gradually, and building consistency.

    Back exercises can involve different areas of the upper, middle, and lower back. Many movements also involve the core and hips, which makes them useful for general physical fitness.

    1. Bird Dog

    The bird dog is a beginner-friendly exercise that focuses on stability and controlled movement.

    Start on your hands and knees with your hands underneath your shoulders and your knees underneath your hips. Keep your back in a comfortable neutral position.

    Slowly extend one arm forward while extending the opposite leg backward. Try to keep your hips and shoulders stable.

    Hold the position briefly, then return your hand and foot to the floor. Repeat on the opposite side.

    You do not need to lift your arm or leg extremely high. Controlled movement is more important than reaching as far as possible.

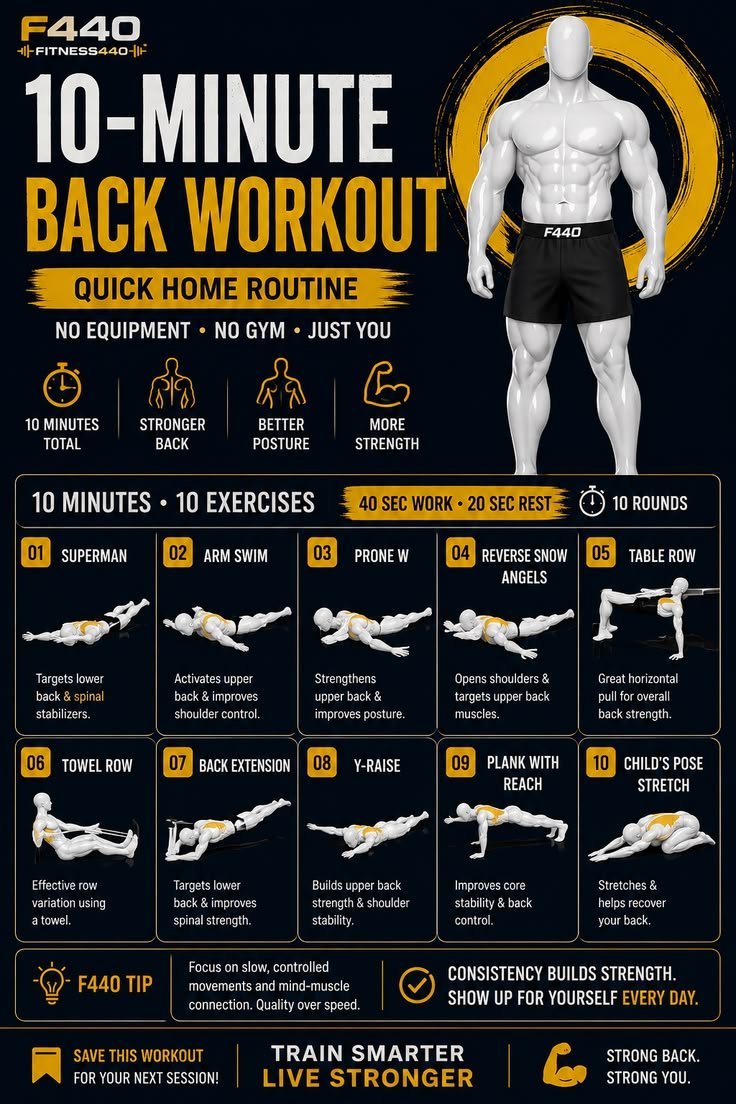
    2. Superman Exercise

    The Superman exercise is a bodyweight movement that works the muscles along the back while also involving the hips and shoulders.

    Lie face down on a comfortable surface. Extend your arms in front of you and keep your legs extended behind you.

    Gently lift your arms and legs a small distance from the floor while keeping your movement controlled. Hold briefly, then slowly lower them.

    You do not need to lift very high. A small, controlled movement can be enough for beginners.

    If the exercise causes discomfort in your lower back, reduce the range of motion or choose another exercise.

    3. Prone Y Raise

    A prone Y raise is a simple exercise for practicing upper-back and shoulder control.

    Lie face down with your arms extended forward at an angle so that your body forms a shape similar to the letter Y.

    Gently lift your arms from the floor while keeping your neck relaxed. Hold briefly and lower your arms slowly.

    The movement should be small and controlled. There is no need to force your arms upward.

    This exercise can be useful for beginners who want to improve upper-back movement without using weights.

    4. Prone T Raise

    The prone T raise is similar to the Y raise, but your arms move out to the sides.

    Lie face down and extend your arms sideways, forming a T shape with your body.

    Gently lift your arms and squeeze your shoulder blades together in a controlled way. Lower your arms slowly.

    Avoid lifting your head at the same time. Keep your neck relaxed and focus on moving your arms and upper back.

    5. Glute Bridge

    Although the glute bridge is often considered a lower-body exercise, it also helps develop control through the hips and lower back.

    Lie on your back with your knees bent and your feet flat on the floor.

    Place your arms comfortably beside your body. Tighten your core gently and press through your feet to lift your hips.

    Pause briefly at the top and then lower your hips slowly.

    Try to avoid pushing your hips excessively high. The movement should feel controlled and comfortable.

    Strong hip movement can support many activities that involve the back and lower body.

    6. Bird Dog Hold

    Once you are comfortable with the basic bird dog, you can practice holding the extended position.

    Start on your hands and knees. Extend one arm and the opposite leg.

    Hold the position for a short period while keeping your body stable. Then return to the starting position and switch sides.

    If you notice your hips rotating or your lower back moving excessively, reduce the length of the hold.

    This exercise is more about stability and control than speed.

    7. Wall Angels

    Wall angels can help beginners practice upper-back and shoulder movement.

    Stand with your back near a wall. Place your arms in a comfortable position with your elbows bent.

    Slowly move your arms upward and then back down.

    Do not force your arms to remain against the wall if your mobility does not allow it. Keep the movement comfortable and controlled.

    Wall angels can be included in a warm-up or a beginner upper-body routine.

    8. Reverse Snow Angels

    Reverse snow angels are performed while lying face down and can help develop control in the upper back and shoulders.

    Lie on your stomach with your arms extended near the floor.

    Slowly move your arms outward and toward your sides, similar to making a snow angel. Then return them to the starting position.

    Keep the movement slow and avoid lifting your chest excessively.

    If you feel uncomfortable, reduce the range of motion.

    9. Cat-Cow Movement

    The cat-cow movement is commonly used to practice gentle spinal movement.

    Start on your hands and knees.

    Slowly round your back upward while allowing your head and neck to move naturally. Then gently move in the opposite direction, bringing your chest forward while allowing your back to extend comfortably.

    Do not force either position.

    Move slowly and breathe naturally throughout the exercise.

    This movement can be useful as part of a warm-up before other exercises.

    10. Plank

    The plank is mainly known as a core exercise, but your back and shoulders also work to stabilize your body.

    Start with your hands on the floor and your arms extended, or use your forearms if that feels more comfortable.

    Keep your body aligned and your core gently engaged.

    Hold the position for a manageable amount of time. You do not need to hold the plank for several minutes.

    If your hips begin to drop or rise significantly, stop and rest.

    Beginners can also perform a modified plank with their knees on the floor.

    11. Side Plank

    The side plank challenges the muscles responsible for stabilizing your trunk.

    Lie on your side and support yourself with your forearm. Lift your hips while keeping your body aligned.

    You can keep your knees bent to make the exercise easier.

    Hold the position for a short period and then switch sides.

    The side plank can help develop stability around the trunk, which is useful when performing many other movements.

    12. Hip Hinge Practice

    Learning the hip hinge is an important skill for beginners because it teaches you how to move through your hips while keeping control of your back.

    Stand with your feet around hip width apart. Place your hands on your hips.

    Push your hips backward while keeping your spine in a comfortable neutral position. Slightly bend your knees as you move.

    Then push through your feet and bring your hips forward to return to standing.

    Move slowly at first.

    You can practice this movement against a wall by standing a short distance in front of it and trying to move your hips backward toward the wall.

    Why Back Strength Matters

    Your back works during many everyday activities. You use it when sitting, standing, walking, reaching, carrying objects, and changing positions.

    Developing basic back strength can support better movement control and help you perform different exercises more comfortably.

    However, back training does not mean performing difficult exercises every day. Beginners can make progress through simple movements performed consistently.

    How to Build a Beginner Back Workout

    A simple routine could include several exercises that target stability, movement, and strength.

    For example:

    • Bird dog
    • Glute bridge
    • Prone Y raise
    • Plank
    • Hip hinge practice

    You can perform each exercise for a manageable number of repetitions or a short hold.

    The exact amount should depend on your current fitness level. Start comfortably and increase gradually rather than trying to do too much during your first few workouts.

    Focus on Controlled Movements

    One of the most important things for beginners is learning to control each exercise.

    Avoid swinging your arms or moving quickly simply to complete more repetitions.

    For exercises such as bird dogs and prone raises, slow movements can make it easier to notice whether your body is staying stable.

    If your form becomes difficult to maintain, take a break.

    Quality movement is more important than simply completing a large number of repetitions.

    Warm Up Before Back Exercises

    A short warm-up can prepare your body for exercise.

    You can start with light walking or another easy movement. Then perform gentle movements such as cat-cow, arm circles, and hip hinges.

    The warm-up should prepare you without making you tired.

    If you experience discomfort during a warm-up movement, stop and choose a gentler alternative.

    Progressing Without Equipment

    You can make progress without using weights.

    For example, you can begin with a basic bird dog and later practice holding each position longer.

    You can also improve the quality of your movements and gradually increase your range of motion when comfortable.

    Another option is moving from easier variations to more challenging versions.

    For example, you might begin with a modified plank before progressing to a standard plank.

    Progress should be gradual and appropriate for your current ability.

    Common Mistakes Beginners Should Avoid

    One common mistake is rushing through exercises. Fast movements can make it difficult to maintain control.

    Another mistake is trying advanced exercises before learning the basic movement patterns.

    Some beginners also try to train the same muscles every day. Your body needs recovery, so allow enough time between challenging sessions.

    Ignoring pain is another problem. Exercise can feel challenging, but sharp or unusual pain should not be treated as something you simply need to push through.

    If an exercise causes pain, stop and reassess the movement.

    Combine Back Exercises With Other Training

    A balanced workout should involve more than just the back.

    You can combine back exercises with lower-body movements, chest exercises, shoulder exercises, core exercises, and light cardiovascular activities.

    For example, a simple home session might include a squat, incline push-up, bird dog, glute bridge, and plank.

    This approach allows you to train different movement patterns while keeping your routine simple.

    Give Your Body Time to Recover

    Rest is an important part of exercise.

    Your muscles need time to recover after challenging workouts. Instead of trying to train your back intensely every day, include recovery days or alternate different types of exercise.

    Light activities such as walking can be useful on easier days.

    Sleep, regular meals, hydration, and appropriate rest can also support your general ability to exercise.

    Pay Attention to Your Technique

    Good technique becomes especially important when working with the back.

    Keep movements controlled and avoid forcing your spine into extreme positions.

    For exercises involving the floor, use a comfortable surface that allows you to move without unnecessary pressure.

    If you are unsure how to perform an exercise, ask a qualified coach, physical education teacher, or another knowledgeable adult to help you check your technique.

    If you have a current injury or persistent pain, speak with a healthcare professional before beginning exercises that could affect the area.

    Keep the Routine Simple

    You do not need a large collection of exercises to begin strengthening your back.

    A few basic movements performed consistently can give you an excellent starting point.

    You can begin with bird dogs, glute bridges, planks, wall angels, and hip hinge practice. Once these movements become comfortable, you can gradually introduce more challenging variations.

    The goal is to build good movement habits and improve your strength over time rather than trying to make every workout difficult.

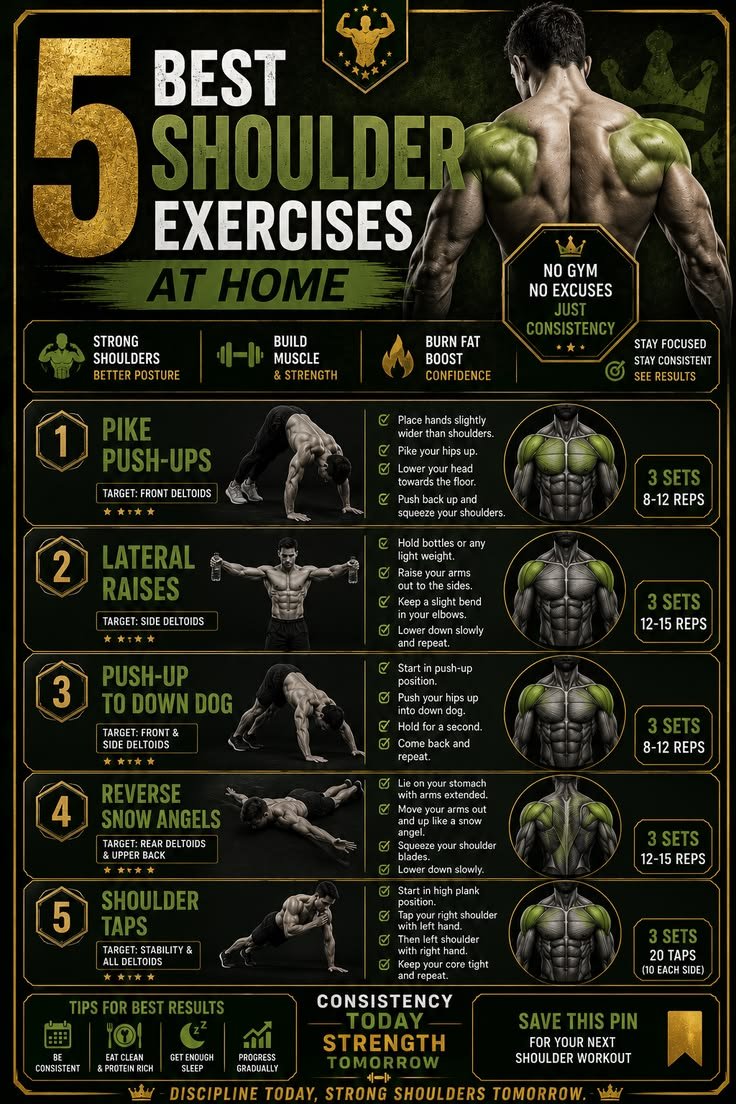
  • Best Shoulder Exercises You Can Do at Home

    Best Shoulder Exercises You Can Do at Home

    Shoulder exercises can be a useful part of a balanced home workout routine. Strong and well-controlled shoulders can help with everyday movements such as reaching, lifting, carrying, pushing, and maintaining good upper-body movement. You do not always need weights or gym equipment to work on shoulder strength. Many simple exercises can be performed at home using your own body weight.

    The shoulders are involved in many upper-body movements, so they often work together with the arms, chest, back, and core. Because of this, shoulder training does not have to involve complicated exercises. Simple movements performed with good technique can provide a useful starting point for beginners.

    1. Wall Push-Ups

    Wall push-ups are an easy exercise for beginners and can introduce your shoulders to pushing movements.

    Stand facing a wall and place your hands against it around chest or shoulder height. Keep your feet comfortably behind you and maintain a straight body position.

    Slowly bend your elbows and bring your upper body toward the wall. Then push through your hands to return to the starting position.

    Keep the movement controlled and avoid rushing. If the exercise feels too easy, you can gradually move your feet farther away from the wall.

    2. Incline Push-Ups

    Incline push-ups can work the shoulders while also involving the chest and arms.

    Place your hands on a stable elevated surface and step your feet backward. Keep your body aligned from your head to your feet.

    Bend your elbows and lower your chest toward the surface. Push yourself back up while maintaining control.

    The height of the surface can affect the difficulty. A higher surface is generally easier, while a lower surface can require more strength.

    Always make sure the surface is stable before using it for exercise.

    3. Pike Push-Ups

    Pike push-ups are a more challenging bodyweight exercise that places greater emphasis on the shoulders.

    Begin in a position similar to a downward-facing triangle, with your hands on the floor and your hips raised. Your legs can be straight or slightly bent depending on your flexibility.

    Bend your elbows and lower your upper body toward the floor while keeping your hips elevated. Then push through your hands to return to the starting position.

    Start with a small range of motion if the exercise is new to you. You can gradually increase the range as your control improves.

    4. Plank Shoulder Taps

    Plank shoulder taps combine shoulder stability with core control.

    Start in a high plank position with your hands under or slightly outside your shoulders. Keep your body stable.

    Lift one hand and gently tap the opposite shoulder. Return the hand to the floor and repeat on the other side.

    Try to minimize movement through your hips. The goal is controlled movement rather than performing the taps quickly.

    If the exercise is difficult, you can perform it from your knees while maintaining a stable body position.

    5. Arm Circles

    Arm circles are a simple movement that can be included in a warm-up or light shoulder routine.

    Stand upright and extend your arms out to the sides. Make small circles with your arms and gradually increase the circle size if the movement feels comfortable.

    After several repetitions, change direction.

    Arm circles should be performed in a controlled way. They are not designed to be an exhausting strength exercise, but they can help you move your shoulders through a comfortable range of motion.

    6. Wall Angels

    Wall angels can help you practice controlled shoulder and upper-back movement.

    Stand with your back against a wall if the position is comfortable. Place your arms against or near the wall in a position similar to making a goal-post shape.

    Slowly move your arms upward and then back down while maintaining control.

    Not everyone will be able to keep their entire arms against the wall throughout the movement. Do not force your shoulders or arms into a position that feels uncomfortable.

    Focus on smooth movement rather than trying to achieve a perfect range of motion.

    7. Bear Plank Shoulder Taps

    The bear plank shoulder tap adds a different challenge to the shoulders and core.

    Start on your hands and knees. Lift your knees slightly from the floor while keeping your back relatively flat.

    From this position, slowly lift one hand and tap the opposite shoulder. Return it to the floor and repeat on the other side.

    Because your knees are elevated, your shoulders and core need to help stabilize your body.

    If this feels too difficult, return to regular shoulder taps from a high plank or perform the movement with your knees on the floor.

    8. Downward-Facing Dog

    Downward-facing dog is a bodyweight movement that involves the shoulders while also moving the hips, legs, and upper back.

    Begin on your hands and knees. Push your hips upward and backward while straightening your arms as much as is comfortable.

    Keep your hands firmly connected to the floor and allow your head and neck to remain relaxed.

    You do not need to force your heels toward the floor. The focus should be on comfortable movement and maintaining control.

    This exercise can also be used as part of a warm-up or mobility routine.

    9. Plank Hold

    A plank hold requires your shoulders to help support and stabilize your body.

    Start with your hands on the floor and your arms extended. Keep your body in a straight line while maintaining a controlled position.

    You can also perform a forearm plank if that position feels more comfortable.

    The goal is not to hold the plank for an extremely long time. Start with a manageable duration and focus on maintaining good form.

    If your hips begin to drop or rise significantly, take a break.

    10. Incline Shoulder Taps

    Incline shoulder taps are a beginner-friendly alternative to floor shoulder taps.

    Place your hands on a stable elevated surface. Step your feet backward and create a straight body position.

    Lift one hand and tap the opposite shoulder. Return your hand to the surface and switch sides.

    Because your hands are elevated, the exercise can be easier to control than a floor-based version.

    As you become more comfortable, you can gradually use a lower surface.

    11. Slow Pike Push-Ups

    Once you are comfortable with basic pike push-ups, you can make them more challenging by slowing the lowering phase.

    Start in your pike position and lower your upper body gradually. Avoid dropping quickly toward the floor.

    Then push through your hands to return to the starting position.

    The slower movement can help you practice control. You do not need to perform many repetitions for the exercise to be useful.

    12. High Plank to Downward Dog

    This movement combines two positions and requires the shoulders to work through movement.

    Start in a high plank position. Keep your hands on the floor and push your hips backward and upward into a downward-dog position.

    Then return to the plank position.

    Move slowly and comfortably. Avoid forcing your shoulders through a range of motion that causes discomfort.

    This can be included in a warm-up or as part of a bodyweight workout.

    How to Create a Simple Shoulder Workout

    You do not need to perform every shoulder exercise in one session. Select a few exercises based on your current fitness level.

    A beginner might start with:

    • Arm circles
    • Wall push-ups
    • Incline shoulder taps
    • Plank holds

    Someone with more experience might include:

    • Pike push-ups
    • Plank shoulder taps
    • Downward-facing dog
    • Slow pike push-ups

    Start with exercises you can control. As your strength and coordination improve, you can gradually introduce more difficult movements.

    Focus on Shoulder Control

    Shoulder exercises should not be performed only for the number of repetitions completed. Movement quality is important.

    Try to keep your shoulders controlled throughout each exercise. Avoid using fast, uncontrolled movements simply to finish a set.

    For exercises such as shoulder taps, keep your body as stable as possible. For push-up variations, maintain a comfortable arm and elbow position.

    If your form starts to break down, reduce the difficulty or take a short rest.

    Warm Up Before Shoulder Exercises

    A warm-up can prepare your shoulders and upper body for exercise.

    Start with a few minutes of light movement. You can use arm circles, gentle shoulder movements, and easy wall push-ups.

    The purpose of a warm-up is to gradually prepare your body rather than make you tired before the workout begins.

    If you notice discomfort during the warm-up, do not ignore it. Choose a gentler movement or stop the exercise.

    How to Make Shoulder Exercises More Difficult

    You can progress without buying equipment.

    One option is to move from easier variations to harder ones. For example, you might begin with wall push-ups, progress to incline push-ups, and later practice more demanding bodyweight movements.

    You can also improve your control by slowing down repetitions.

    Another method is increasing the range of motion when you can do so comfortably and safely.

    Progress should be gradual. There is no need to move to a difficult exercise before you are ready.

    Give Your Shoulders Time to Recover

    Shoulder muscles and joints need recovery just like other parts of the body.

    Avoid turning every workout into an intense shoulder session. You can alternate training days or combine shoulder exercises with other types of movement.

    Recovery also gives you time to practice exercises with better technique during your next session.

    If your shoulders feel unusually tired or painful, take a break rather than forcing another difficult workout.

    Combine Shoulder Training With Full-Body Exercise

    Shoulder exercises work well as part of a complete home fitness routine.

    You can combine them with lower-body exercises such as squats and lunges, upper-body movements such as push-ups, and core exercises such as planks.

    For example, a simple workout could include:

    1. A short warm-up
    2. A shoulder movement
    3. A push-up variation
    4. A leg exercise
    5. A core exercise
    6. Light movement to finish

    This gives your body a wider variety of movements instead of focusing on one area during every workout.

    Common Shoulder Exercise Mistakes

    One common mistake is trying to perform difficult exercises too soon. Pike push-ups and other demanding movements require more strength and control than basic variations.

    Another mistake is rushing through repetitions. Fast movements can make it harder to maintain good technique.

    Some people also continue exercising despite discomfort. If a movement causes pain, stop and reassess it rather than trying to push through.

    Finally, avoid believing that more exercise is always better. A balanced routine with appropriate recovery can be more useful than repeatedly training the same muscles.

    Make Exercise Consistent

    You can develop shoulder strength and movement control without complicated equipment. The most important starting point is choosing exercises that match your current ability.

    Begin with simple movements, practice them regularly, and gradually increase the difficulty as your control improves. You can use wall push-ups, incline movements, planks, shoulder taps, and other bodyweight exercises to create a practical home routine.

    If you are new to exercise or have a shoulder injury or other physical concern, consider asking a qualified adult, coach, or healthcare professional about appropriate exercises and modifications before starting a new routine.